In the toolbar of the map activity you will find actions that provide access to frequently used functions.

The following table describes the function of each button.
| Icon | Description |
|---|---|
|
|
Displays the current (GPS enabled) or the last known location (GPS disabled) on the map. If the GPS is disabled, the location might be provided by the network. |
|
|
Starts the track record mode. The track log starts when a GPS signal is available. While waiting for a signal the button is yellow and turns red after the track recording has started. Press the button again to stop or pause the recording. |
|
|
Opens a dialog to configure what is shown on the map. Using this dialog you can set the displayed base map and overlays. Depending on the current mode of the app you can also (de-)activate existing map overlays. Please note that some layers - as the Google Maps and Bing layers - cannot be cached due to their license and therefore can not be used offline. These layers are marked with a wifi symbol to indicate that they need a working network connection. |
|
|
To start a GoTo or Route navigation. |
Use the + button to zoom in and the - button to zoom out one level. The currently set zoomlevel is shown between both buttons.
Depending on your device and the map you use you might want to increase the scaling. You can set this value after doing a long tap on one of the zoom buttons. Note that the map might become blurry with large values.
The following items can be found in the 3-dots menu of the map view.Die folgenden Aktionen befinden sich im 3-Punkte Menü der Kartenansicht.
Add Waypoint
Starts the mode to add a new waypoint. A crosshair is displayed in the middle of the map. Move and zoom the map until you find the right location to add. By clicking on the button at the top right to the text box the item is saved. Use the Back button to cancel adding a new waypoint.
Search
Search map features and locations by name. A parallel search on the local database and web services is performed. The local database contains major cities worldwide and is available in some pro versions. Local database search is also available for offline usage.
Please note that the local database is currently only bundle with some selected Pro versions.
New Route
To create a new route on the map.
Measure
To measure distances and areas. The displayed output unit can be changed by clicking on the result.
Map Legend
Open the right drawer and shows the maps legend (if any). Currently shown waypoints, tracks and routes will also be presented here.
Cache Map
To cache parts of the currently active map for offline use. The following overlay appears:

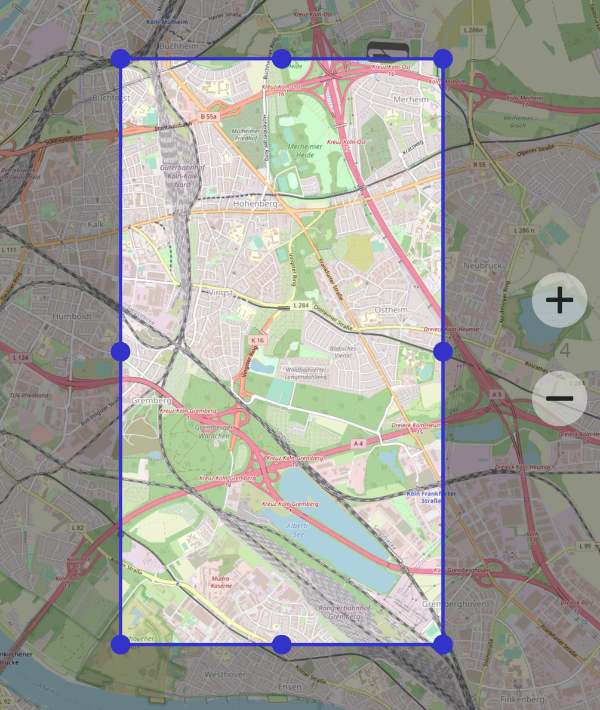
Use the handles to specify the area you would like to cache. Click on "Next" if you are ready to proceed.
Use the zoom level input view to specify which zoom levels of the map are to be saved. By default the starting zoom level is the currently set map zoom level. Use "Settings" from the menu to change this setting.
Please note that the bulk download can cause high volumes of traffic. You should switch to airplane mode and use a WIFI connection.
To print or save the currently displayed map as an image.
Import
To import waypoints, tracks or routes from various file formats like gpx or kmz and to add new map layers.

The following items can be found in the navigation drawer located on the left side of the map view.
Tripmaster
Switch to the tripmaster. The Tripmaster provides a numerical and graphical overview of various movement data.
Waypoints
Opens the activity to manage waypoints. If no waypoints are present, the list is empty.
Tracks
Opens the activity to manage tracks. If no tracks are present, the list is empty.
Routes
Opens the route list. Use the New Route action located in the menu to create a new route.
Preferences
To configure the app settings (see section Preferences).
Help
Shows this help document.
Tutorial
Shows a quick start tutorial.
The app supports keyboard shortcuts. This is useful if you have connected a keyboard or are using an external control.
| Key | Action |
|---|---|
|
←↑↓→ |
Move the current map view |
|
+ |
Zoom in |
|
- |
Zoom out |
|
L or N |
Toggle Locate Me |
|
R or D |
Toggle track record |
|
C |
Set map sync |
|
T |
Open Tripmaster |
|
W |
Add a new waypoint at the current map center location. |
The default keyboard mapping is compatible with Barbuttons.
The Tripmaster provides a quick overview on values such as speed, distance, etc. The tripmaster can be accessed via the corresponding action in the navigation dropdown in the map view or by a single tap on the app icon. To leave the Tripmaster, you can tap on the app icon in the upper left corner or use the back button. If have a keyboard or external controller connected to your device, you can use the T key.
The following section lists all currently available data fields.
| Datafield | Description |
|---|---|
|
Speed |
Shows the current speed. |
|
Speed Average |
Shows the average speed over the entire distance and time. |
|
Maximum |
Shows the maximum speed. |
|
Distance |
The total distance traveled. |
|
Lat/Lon |
Current latitude / longitude according to the last GPS position. |
|
Accuracy |
Accuracy of the last acquired GPS position. |
|
Altitude |
Altitude according to the GPS-Receiver. Please note that these values might be very inaccurate. |
|
Course |
The current driving course. |
|
Compass (flat) |
A cockpit-like flat compass. If a GOTO target is set, it displays the direction to the target as well. |
|
Compass |
A classical compass. If a GOTO target is set (or a route is active), it displays the direction to the target as well. |
|
Speedometer |
Graphical representation of the current speed. |
|
Sunrise/Sunset |
Time of sunrise/sunset at the current location. |
| Datafield | Description |
|---|---|
|
Aerial Distance |
Aerial distance to the set GOTO target / the next route point. |
|
Pointer |
An arrow showing the direction to the set GOTO target / the next route point. |
|
Route End |
Distance to the end of the route. |
|
Time OT |
The time since the start of a track record. |
|
Waypoint |
Name of the current GOTO target (if any). |
|
Direction |
Shows the direction and distance to the GOTO destination / next route point. The direction is calculated based on the driven course in movement​ or based on the values returned by the compass device on halt. |
| Datafield | Description |
|---|---|
|
Lat/Lon |
Current latitude/longitude according to the last GPS position. |
|
UTM |
UTM (Universal Transverse Mercator) coordinates according to the last GPS position. |
|
MGRS |
Current MGRS (military grid reference system) coordinates according to the last GPS position. |
The direction to the destination is determined by values supplied by the built-in compass. If the accuracy of the built-in compass is low, there are corresponding differences in the indication of the direction. If the accuracy of the signal is not high, a message will appear.
The values are updated only when either a track record or a GOTO has been started. To start recording a track you can use the "REC" button.
Using this activity you can manage your waypoints. Some actions can be performed on multiple waypoints. For example, you can view multiple waypoints on the map by selecting them in the list and clicking the Show On Map button.
The menu provides actions to sort, import, export or select all waypoints. At the time of writing the following actions are available using the context menu of a waypoint item:
Show on map
Displays the selected waypoints on the map.
Show Details
Displays detailed information about a waypoint and an optional photo.
Goto
Starts the Goto mode for the given waypoint.
Delete
To delete on or more waypoints.
Edit
To edit the name and description of a waypoint.
Export
To Export given waypoint as a GPX, KML or KMZ file to the local file system.
Share
To send the given waypoint as a GPX, KML or KMZ file attached to a mail or to share the waypoint in a textual form, e.g. in a mail or to post a waypoint in a social network.
Use with other apps
To display the selected waypoint in another app installed on the device.
Start Google Navigation
Starts the Google Navigation to the given waypoint.
A track is a recorded sequence of GPS positions (latitude/longitude) with timestamps, often including elevation and speed. It represents the path you traveled and can be displayed on the map, analyzed, exported or shared.
Use this list to manage your tracks. If a track is selected the the context actions will get visible. Using the menu you can reach the command to import a track. The following commands can be found In the context menu of a track:
Show On Map
Displays the selected track on the map.
Show Details
Displays detailed information about a track. Some data, e.g. the speed will be shown in a diagram.
Please note that the altitude as provided by the GPS is often very inaccurate. Use Fetch Height to get more accurate elevation data (SRTM).
Delete
To delete on or more tracks.
Edit
To edit the name and description of a track.
Export
To export the selected track as a GPX, KML or KMZ file. The file will be stored on the sd-card in the directory [cache_root]/tracks.
Share
Share the given track as a GPX, KML or KMZ file.
Track Back
Create a track back route from a given track. If you just recorded a track the generated route will guide you back to your start point.
The details view shows all information available for a track, including name, description, timestamps, distance, speed and elevation statistics. A map representation displays the recorded path and provides playback controls to animate the track over time.
Map controls allow play, pause, step forward/backward and jump to a specific timestamp. The animation marker follows recorded positions and can be synchronized with the diagrams below.
Diagrams show elevation, speed and horizontal accuracy over time. Tapping a point in any diagram highlights the corresponding location on the map and in the other charts.
Note: GPS-provided elevation is often inaccurate. Use the Fetch Height functionality to improve elevation data (e.g. SRTM) before relying on elevation-based analyses.
A Route consists of at least two points that describe the path you are going to travel. After a route has been created or imported it can be started, so that the app will guide you from point to point.
Routes can be created in several ways. The easiest way is to create a route from your current location to a point in the map view. To do so simply tap on a point on the map and then choose Route from the menu.
To create a new route use the New Route action located in the menu of the map view. Insert a new point by tapping on the map. To move an existing route point long press on it. A view displaying the map content under your finger will be presented in the upper left corner of the display. To import a waypoint choose Append Waypoint from the menu. To undo/redo an operation use the actions presented in the action bar. Use the Save action to save the new route.
You can create a track back route from a recorded track that will guide you back to the start point of your track. To do so use the Track Back action located in the menu of the track list.
To import a route you can use the Import action located in the menu of the route list. GPX and KML/KMZ files containing path data can be imported. Note that large routes might get simplified during the import process. In this case the simplified route will be displayed on top of the original path when the imported route is shown on the map.
To start a route navigation doone of the following:
Open the route list, select a route and choose Start route
Click on the Navigation Action button located in the action bar of the map view and choose Start Route. A dialog will appear that allows you to select the route to start.
In the options view you can configure various settings of the app. The settings are grouped into different sections.
Only some settings that might need explanation are described here. Most settings are self-explanatory.
Preferences used in all parts of the app.
Keep display active
Enable this option to keep the background light active.
Beep on GPS fix
Plays an acoustic signal at the first GPS fix and on reach of a GOTO target.
Follow Position
In follow position mode network locations can be used as the only location providers. This might be useful in areas with a high wifi density or in larger halls. You can also specify a time and distance interval for the location updates.
Toolbar bottom
To show the toolbar at the bottom of the map view.
Tap Zoom
Double tap to zoom into the map. The map will get zoomed to the tapped point.
Overzoom
The overzoom feature allows you to easily scale the map using the zoom buttons. Note that no new tiles will be requested and the view will become blurry as the maximum zoom level of the map is reached.
Show Zoom Animation
Activate to show zoom animations.
Rotate on pinch
Whether or not to allow map rotation during a pinch zoom operation.
Show Scale Bar
If turned on a scale bar will be displayed at the lower right of the map view.
Show data fields
In Track Record, GoTo, Route and Follow Position mode data fields can be displayed on top of the map. The assignment of these fields can be configured. There are 4 different data fields assignment configurations, one for each mode.
Marker
To get information on a specific location on the map do a long tap on the desired position. You can configure if an address and/or the height of the given position should be fetched.
Track Record
The given color and size is used to display the track path during track record.
Track
The given size is used to display recorded or imported tracks. If you display more than one track at once the first track will have the configured color.
My Location
Specify the color and size of the my location overlay.
A track is recorded as a straight line. What can I do?
Please open the Preferences and click on the exclamation mark (Systemcheck) located in the toolbar. Are any issues listed? It is likely that the battery savings settings are causing this problem.
What is the location of the cache directory?
The map tiles are cached in [cache_root]/tilecache . You can adjust the path to the cache directory (.e.g. to use a SD-Card) under Menu -> Preferences -> Cache Root Path.
What data is deleted when the corresponding button under manage applications will be used?
All data! You will loose all recorded waypoints, tracks and routes . But you can safely delete the cache.
How can I preload maps, so that I can use them offline?
Select the desired map layer and zoom to your area of interest. Press the menu button of your device and select Cache Map. Now drag the slider to the max zoom level you want to cache and start by pressing the Download button. All loaded tiles will be available for offline use.
Is there a way to optimize th sd card for a lot of cached map tiles?
Format the sd card with a small block size like 1024 bytes. On a windows system: format o: /FS:FAT32 /A:1024
Can I install the pro version of the app again without getting charged for it again?
Yes! Open the Play Store app and ensure you have a working network connection and you are logged in with the account you bought the app with and you will be able to reinstall the app without getting charged.
Can I install and use the pro version on mutiple devices?
You can use the app on all devices that use the google account you bought the app with. Make sure you are logged in with correct Google account in Google Play Store and download the PRO version without getting charged again.
How can I cancel my subsription?
Open the Google Play Store and select Subscription. Select the subscription of the app and cancel it. If you can't find the subscription, please check if you are logged in with the correct Google account.
This application uses OpenStreetMap tiles: (c) OpenStreetMap contributors, CC-BY-SA
This application uses the OSM Nominatim Webservice to search OSM data by name: Nominatim Usage Policy.
This application uses the Google Geocoding API to search for named features: Google Maps/Google Earth APIs Terms of Service.
IT IS YOUR OBLIGATION TO READ AND ACCEPT ALL SUCH TERMS AND CONDITIONS PRIOR TO USE OF THIS CONTENT.